Integrate ComfyUI Workflows into your apps via API: A Guide to ViewComfy

This guide goes over all the steps to integrate a ComfyUI workflow into a Python or TypeScript application via the ViewComfy API. The first section will go over the details of deploying the workflow and turning it into a serverless API. This should only take a few minutes with the ViewComfy dashboard. We will then go over how to call the API and make the integration.
Deploying your workflow
The first thing you will need to do is to deploy your ComfyUI workflow. In this example, we will deploy a custom workflow. You could also deploy a template from ViewComfy, which can be quicker if you find the right one.
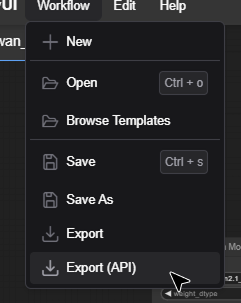
Once you have the workflow_api.json for the workflow you want to deploy, you can head to the ViewComfy dashboard.
After selecting “Deploy your own”, you will have the option to choose the GPU you want to run your workflow on. You can then name your deployment and drop your workflow_api.json file.
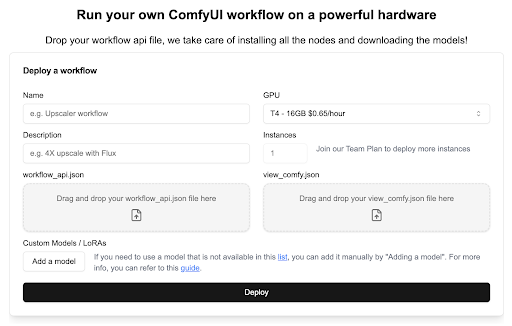
Once everything is ready, you can click “Deploy”. The system will go through your workflow and install all the nodes you need to run it. It will also go through the models and download the ones from this list automatically. If some models are missing from the list, no worries, you can add them before deploying using the “Add a model” button. You will also have the option to add new models once the deployment is live. For more info on how to add models, you can refer to this guide.
Depending on how many models the system has to download, it usually takes between 5 to 30 min to get your deployment ready. In some cases, like if you need to download the full Flux model family, it can take longer.
Once your workflow is deployed, you will be able to access it via the dashboard.

You can make sure that everything was installed properly by clicking on the “ComfyUI” link and testing your workflow via the usual Comfy interface*. If you need to install new nodes, you can use the Comfy Manager in the same way you would locally. And if you want to add new models, you can use the “add a model” button on the dashboard.
Once everything is in place, you can start integrating the API using the “API endpoint” link from the dashboard.
*note that sometimes the workflow does not load in the UI automatically. If that happens, you can just drop it in the Comfy interface as you would normally do
Calling the workflow with the API
The ViewComfy API is a REST API that can be called with a standard POST request but also supports streaming responses via Server-Sent Events. This second option allows for real-time tracking of the ComfyUI logs. In this guide, we will go over how to call the API with the streaming response.
All the code you need to run the API can be found in this GitHub folder (this guide uses the Python example code, you can access the TypeScript example code here. It works in the same way.) After downloading all the files, you can install the dependencies:
pip install -r requirements.txt
For the rest of the examples, we will use the Wan 2.1 image-to-video template from ViewComfy. You can deploy it from your dashboard if you want to follow along.
- Getting your API keys
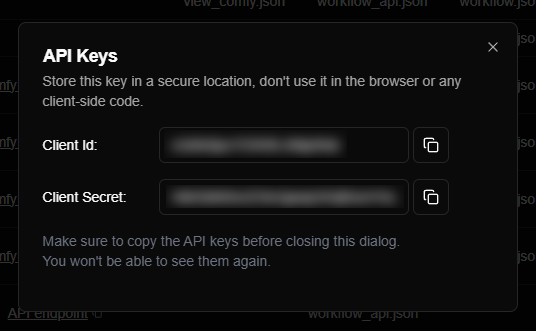
In order to use your API endpoint, you will first need to create your API keys.

After opening the API key menu from your dashboard, you can copy your “Client ID” and “Client Secret”. Keep them somewhere safe as you will need them to call the API.
2. Extracting your workflow parameters
The first thing to do before setting up the request is to identify the parameters in your workflow. This is done by using workflow_parameters_maker.py to flatten your workflow_api.json. You can run the script directly from your terminal:
python workflow_parameters_maker.py --workflow_api_path "<Path to your workflow_api.json file>"
The flattened json file should look like this:
{
    "_3-node-class_type-info": "KSampler",
    "3-inputs-cfg": 6,

    …

    "_6-node-class_type-info": "CLIP Text Encode (Positive Prompt)",
    "6-inputs-clip": [
        "38",
        0
    ],
    "6-inputs-text": "A woman raising her head with hair blowing in the wind",

    …

    "_52-node-class_type-info": "Load Image",
    "52-inputs-image": "<path_to_my_image>",

    …

}
This dictionary contains all the parameters in your workflow. The key for each parameter contains the node id from your workflowapi.json file, whether it is an input, and the parameter’s input name. Keys that start with “” are just there to give you context on the node corresponding to id, they are not parameters.
In this example, the first key-value pair shows that node 3 is the KSampler and that “3-inputs-cfg” sets its corresponding cfg value.
3. Updating the script with your parameter
All the code you will need to call the API, parse the results and save the outputs are in main.py and api.py. In most cases, the only file you will need to edit is main.py. This is where you will add the parameters you want to change, your API endpoint, and the directory to save your outputs.
The first thing to do is to copy the ViewComfy endpoint from your dashboard and set it to view_comfy_api_url. You should also get the “Client ID” and “Client Secret” you made earlier, and set the client_id and client_secret values:
view_comfy_api_url = "<Your_ViewComfy_endpoint>"
client_id = "<Your_ViewComfy_client_id>"
client_secret = "<Your_ViewComfy_client_secret>"
You can then set the parameters using the keys from the json file you created in the previous step. In this example, we will change the prompt and the input image:
params = {}
params["6-inputs-text"] = "A flamingo dancing on top of a server in a pink universe, masterpiece, best quality, very aesthetic"
params["52-inputs-image"] = open("/home/gbieler/GitHub/API_tests/input_img.png", "rb")
4. Calling the API
Once you are done adding your parameters to main.py, you can call the API by running:
python main.py
This will send your parameters to api.py where all the functions to call the API and handle the outputs are stored.
By default the script runs the “infer_with_logs” function which returns the generation logs from ComfyUI via a streaming response. If you would rather call the API via a standard POST request, you can use “infer” instead, like so:
 # Call the API and wait for the results
    prompt_result = await infer(api_url=view_comfy_api_url, params=params, override_workflow_api=override_workflow_api)

...

  # prompt_result = await infer_with_logs(
  #     api_url=view_comfy_api_url,
  #     params=params,
  #     logging_callback=logging_callback,
  #     override_workflow_api=override_workflow_api
  # )
The result object returned by the API will contain the workflow outputs as well as the generation details. It is formatted as follows (For the full definition you can refer to “PromptResult” inside api.py.):
prompt_id (str): Unique identifier for the prompt
status (str): Current status of the prompt execution
completed (bool): Whether the prompt execution is complete
execution_time_seconds (float): Time taken to execute the prompt
prompt (Dict): The original prompt configuration
outputs (List[Dict], optional): List of output file data. Defaults to empty list.
Your outputs will automatically be saved in your working directory.
Editing the workflow
So far we’ve seen how to make an API request to the workflow you uploaded when deploying. In this section, we will go over how to make a request using a different workflow. This approach will work with any workflow that can run on your deployment, so make sure you have installed all nodes and models you need to run the new workflow. (see the “Deploy your workflow” section for information on how to install new nodes and models to a deployment)
The first step is to extract the workflow_api.json file for the new workflow. In this case, I will use this file, which is my Wan 2.1 workflow with the addition of a LoRA. You can then add the path to the new workflow_api.json file to “override_workflow_api”:
override_workflow_api_path = "<path_to_your_new_workflow_api_file>"
From that point onward, you can follow the steps from the previous section to get the parameters from the workflow and make the API call.
Conclusion
ViewComfy provides a quick and flexible way to convert any ComfyUI workflow into an API. You can manage all of your deployments, edit them and add new models directly from the dashboard. They also come with a production-ready and scalable API out of the box.
Using the example code from this repo, you can quickly integrate the API into your Python and TypeScript applications.
Have questions or want to share your implementation? Join the discussion on our discord or reach out to the team team@viewcomfy.com.